Having an iPhone makes it easier for the users to be able to track their mails even when they have several different email accounts – that is definitely a good thing! Multi-account access makes it so much easier to keep up with messages from different inboxes, calendars and notes that they have in their email.
However, sometimes it would be very difficult to look for mails if they are not properly arranged or sorted out. Have you ever came across this problem? This article will present you with a viable solution, so make sure to read through.
There are many great features worth praising about the iPhone and its e-mail app. However, not all is perfect, and an obvious flaw in some versions is the lack of a way to sort e-mails into folders to keep everything organized. This has been one problem that man iPhone users complain about, but truth of the matter there is actually a pretty simple workaround!
How to create e-mail folders on your iPhone
It’s certainly a good thing that users can create folders in their iPhone with the use of internet webmail. And these folders can then be synced with your mail application in your iPhone device. If you’re wondering exactly how to sync it, then you must follow these simple steps below.
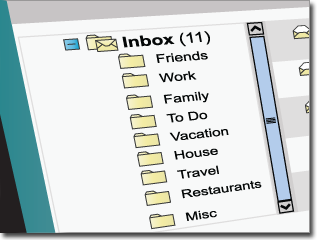
First thing to do is to open your email account in the webmail portal, not in the mail application of iPhone. Then create a new folder to be used for organizing your messages in your email. After creating a folder, you then open the mail application in your iPhone. Viewing the inbox of your email, click on the back arrow image on the upper left corner. This arrow means refresh or to update your email. After it has been refreshed or loaded, the folder that you have created will then appear. Then simply click on the folder to open it.
Does that make sense? It’s actually a very simple workaround: if your iPhone mail app does not seem to support creating folders, you just have to create them from your computer or by logging in to your e-mail from the web browser. From there, you just have to look for the desired option and set up as many folders as you want or need. Having done so, just get back to your email app, refresh the data, and it shall bring up the folders you just created!
If you found this simple tutorial useful, we recommend checking out the “Computer Too Slow” website.